
|
Jenzabar-provided data sources vary according to your school's licenses to Candidate and J1 Web Events Management. |
 |
Any data sources you set up are available to all FormFlow instances within your campus portal. |
Data sources are SQL statements that can be used to populate information in different ways across multiple forms. Data sources can save the form user time completing information you already have in your database, help ensure inaccurate information isn't entered, and can keep questions limited to specific choices. There are five types of data sources you can use:
· Options can use information in your database to populate drop-down, radio button, and checkbox lists. For example, you can populate a state drop-down list on your form with a state list from your J1 database. You can set up static options, dynamic options, or cascading options.
· Auto Completes provide a typeahead feature that lets form users start typing a field/question response and then pick from a list of options that automatically appear.
· Look Ups use a 'trigger' question which completes other fields on the form based on information the form user enters or selects. For example, if a faculty member enters their email address, the first and last name fields on the form can be automatically completed for them based on information you have in your database.
· Access Control Lists let you limit who can access your form. For example, you may create a homecoming voting form, but only allow upperclassman to vote.
· Waiver Codes can be used when a payment is associated with your form and your school allows the fee to be waived in certain circumstances.
You can use Jenzabar-provided JZB SQL statements or create your own so you can populate your forms with frequently used database information. Data sources are not limited to one form. You can reuse them as needed.
|
Jenzabar-provided datasources are read-only and cannot be customized. These datasources are prefixed with JZB. For example, "JZB - Event Look Up by ID". |
Prefix a value with ## in the SQL to hold the place for a value to be inserted at execution.
For this feature to work:
|
You must have an established database connection set up in FormFlow. |
|
You must have SELECT permissions to the tables you are saving the form information to. |
Database columns frequently use CHAR data types, which pad values with trailing spaces. This can cause issues when comparing the user entry with what exists in the database. Extra spaces might prevent it from matching.
For example, database might have "NC" as a state and when the user enters "NC ," trailing spaces might be added.
Use RTRIM() on char and nchar columns to ensure values match.
When a data source returns large amount of data from the system, that data source can stop working and other functionality on the page can break. Large data retrievals, often referred to as payloads, can be anything from a list of all the organizations in your system, all names from NAME_MASTER, or large amounts of transactional data.
By default, IIS supports a 100 KB maximum of data per request.
When using cascading options or look up data sources, you'll need to pay careful attention to how you map columns and placeholders to questions on the form to ensure you don’t cause an infinite loop.
For example, with a look up question, you should never map the triggering question as a target question to receive data from the look up. This causes data returned by the query to be set in the triggering question’s field and causes the question to trigger the look up again. Enhancements have been made to prevent users from doing this, but in some versions it is still possible to set the triggering question as a target.
1. Log in to the campus portal as an administrator and access J1 FormFlow - Forms.
2. Click Manage Forms. The Manage Forms page appears.
3. Click Site Administrators.
4. From the toolbar, click Data Sources. The Data Source page appears.
5. Click the Add
icon  to the right of the DataSource drop-down list. The previously inactive
fields become active.
to the right of the DataSource drop-down list. The previously inactive
fields become active.
6. In the Name field, enter a name for the datasource you want to create.
7. From the Use Database drop-down, select the database you want to pull the data from. This could your J1 database or another external database you are using with J1 FormFlow - Forms.
8. If the data source will be used as a list to control access to the form, select the Is Access Control List checkbox.
9. If you do not want the data source to be executed unless a user is logged in, select the Require Authentication checkbox. This may be useful if the data source contains sensitive information. Jenzabar recommends using string replacers in your data source query to further tailor the results that will display to the user.
10. In the DataSource Query field, enter your SQL query that will select and/or filter the information in your database that you want to make available in your form.
11. Click Save DataSource.
Options give the form user a list of items to choose from.
Returns a list of states from the J1 database.
SELECT
RTRIM(VALUE),
DESCRIPTION
FROM
TD_STATE_VIEW
1. Log in to the campus portal as an administrator and access J1 FormFlow - Forms.
2. Click Manage Forms. The Manage Forms page appears.
3. Click Site Administrators.
4. From the toolbar, click Data Sources. The Data Source page appears.
5. Click the Add
icon
to the right of the DataSource drop-down list. The previously inactive
fields become active.
6. In the Name field, enter a name for the datasource you want to create.
7. From the Use Database drop-down, select the database you want to pull the data from. This could your J1 database or another external database you are using with J1 FormFlow - Forms.
8. If you do not want the data source to be executed unless a user is logged in, select the Require Authentication checkbox. This may be useful if the data source contains sensitive information that should not be displayed to a JICS guest user. Jenzabar recommends using string replacers in your data source query to further tailor the results that will display to the user.
9. In the DataSource Query field, enter your SQL query that will select and/or filter the information in your database that you want to make available in your form.
10. Click Save DataSource.
11. Click Manage Forms. The Manage Forms page appears.
12. Click on the form you are working with.
13. Click on the tab you want to work with.
14. Right-click on the drop-down, radio button or checkbox question you are associating the datasource with and select Properties. The Edit Item window appears.
15. Click the Options tab.
16. Select Dynamic Options.
17. From the Options Source drop-down, select the auto-complete data source you created.
18. Click Save.
Set up an Options Data Source for Cascading Options
|
Cascading data sources can only be used with the drop-down question type. |
A cascading options data source relies on the response from another question on the form to be used as a parameter in the query. Because data sources are global, there isn't a way to reference a specific question on a form since the same data source could be used with different forms. Instead, placeholders can be added to the query. At the time of execution, the placeholders get replaced with values supplied to questions on the form that are mapped to those placeholders. A data source placeholder always starts with ## followed by a descriptive name, as seen highlighted in yellow in the sample below.
Sample SQL:
SELECT NAME_FORMAT_BASIC_VIEW.ID_NUM, RTRIM(NAME_FORMAT_BASIC_VIEW.FIRST_MI_LAST)
FROM ORG_MASTER
JOIN NAME_FORMAT_BASIC_VIEW ON ORG_MASTER.ID_NUM=NAME_FORMAT_BASIC_VIEW.ID_NUM
JOIN ADDRESS_MASTER ON ORG_MASTER.ID_NUM=ADDRESS_MASTER.ID_NUM
AND ADDRESS_MASTER.ADDR_CDE='*LHP'
WHERE ADDRESS_MASTER.STATE = ##State
Log in to the campus portal as an administrator and access J1 FormFlow - Forms.
Click Manage Forms. The Manage Forms page appears.
Click Site Administrators.
From the toolbar, click Data Sources. The Data Source page appears.
Click the Add icon to the right of the DataSource drop-down list. The previously inactive fields become active.
In the Name field, enter a name for the datasource you want to create.
From the Use Database drop-down, select the database you want to pull the data from. This could be your J1 database or another external database you are using with J1 FormFlow - Forms.
If you do not want the data source to be executed unless a user is logged in, select the Require Authentication checkbox. This may be useful if the data source contains sensitive information. Jenzabar recommends using string replacers in your data source query to further tailor the results that will display to the user.
In the DataSource Query field, enter your SQL query that will select and/or filter the information in your database that you want to make available in your form.
Click Save DataSource.
Click Manage Forms. The Manage Forms page appears.
Click on the form you are working with.
Click on the tab you want to work with.
Right-click on the drop-down, radio button or checkbox question you are associating the datasource with and select Properties. The Edit Item window appears.
Click the Options tab.
Select Dynamic Options.
From the Options Source drop-down, select the auto-complete data source you created.
A drop-down for the placeholder appears. Select the question you wish to map to the placeholder defined in the query.
Click Save changes.
Auto complete data sources can be used with Textbox question types to suggest possible values to the user as they are typing. These data sources must have at least one, but a maximum of two, columns returned from the query.
The first column is the "search text". As the user types, they'll see values returned from this column that contain the string they have typed in the input. The second column may provide an additional value that will replace the user's input if selected. For instance, the user may type "Sam St" and upon choosing the provided search text "Sam Stack", the ID number associated with Sam Stack would be populated in the textbox.
Sample SQL:
SELECT RTRIM(NAME_FORMAT_BASIC_VIEW.FIRST_MI_LAST)
as
[Search],
ORG_MASTER.ID_NUM
as
[Replace]
FROM ORG_MASTER
JOINNAME_FORMAT_BASIC_VIEW
ON
ORG_MASTER.ID_NUM=NAME_FORMAT_BASIC_VIEW.ID_NUM
1. Log in to the campus portal as an administrator and access J1 FormFlow - Forms.
2. Click Manage Forms. The Manage Forms page appears.
3. Click Site Administrators.
4. From the toolbar, click Data Sources. The Data Source page appears.
5. Click
the Add icon to the right of the DataSource
drop-down list. The previously inactive fields become active.
6. In the Name field, enter a name for the datasource you want to create.
7. From the Use Database drop-down, select the database you want to pull the data from. This could your J1 database or another external database you are using with J1 FormFlow - Forms.
8. If you do not want the data source to be executed unless a user is logged in, select the Require Authentication checkbox. This may be useful if the data source contains sensitive information. Jenzabar recommends using string replacers in your data source query to further tailor the results that will display to the user.
9. In the DataSource Query field, enter your SQL query that will select and/or filter the information in your database that you want to make available in your form.
10. Click Save DataSource.
11. Click Manage Forms. The Manage Forms page appears.
12. Click on the form you are working with.
13. Click on the tab you want to work with.
14. Right-click on the textbox question you are associating the datasource with and select Properties. The Edit Item window appears.
15. Click the Settings tab.
16. From the Auto Complete Data Source drop-down, select the data source you created.
17. Click Save changes.
A look up takes the value supplied by the source question, passes the information back to the database asynchronously, and return values to be assigned to other inputs on the page.
A look up data source can return multiple columns from multiple tables, but the restriction is that a single row is returned from the query. This row is almost always associated with a value provided by the source question. This value can be referenced in the data source query using the parameter "@@LookUpValue".
Sample SQL:
SELECT
NAME_MASTER.FIRST_NAME,
NAME_MASTER.LAST_NAME,
BIOGRAPH_MASTER.BIRTH_DTE
FROM NAME_MASTER
JOIN BIOGRAPH_MASTER
ON
NAME_MASTER.ID_NUM=BIOGRAPH_MASTER.ID_NUM
WHERE NAME_MASTER.ID_NUM
=
@@LookUpValue
|
If the column you are selecting from is a char type or nchar, RTRIM() the column values. Not trimming may result in unexpected effects when interacting with the form. |
1. Log in to the campus portal as an administrator and access J1 FormFlow - Forms.
2. Click Manage Forms. The Manage Forms page appears.
3. Click Site Administrators.
4. From the toolbar, click Data Sources. The Data Source page appears.
5. Click
the Add icon to the right of the DataSource
drop-down list. The previously inactive fields become active.
6. In the Name field, enter a name for the datasource you want to create.
7. From the Use Database drop-down, select the database you want to pull the data from. This could be your J1 database or another external database you are using with J1 FormFlow - Forms.
8. If the data source will be used as a list to control access to the form, select the Is Access Control List checkbox.
9. If you do not want the data source to be executed unless a user is logged in, select the Require Authentication checkbox. This may be useful if the data source contains sensitive information. Jenzabar recommends using string replacers in your data source query to further tailor the results that will display to the user.
10. In the DataSource Query field, enter your SQL query that will select and/or filter the information in your database that you want to make available in your form.
11. Click Save DataSource.
12. Click Done.
13. Click Manage Forms. The Manage Forms page appears.
14. Click on the form you are working with.
15. Click on the tab you want to work with.
16. Right-click on the textbox, drop-down, or hidden question and select Properties. The Edit Item window appears.
17. Click the Look Up tab.
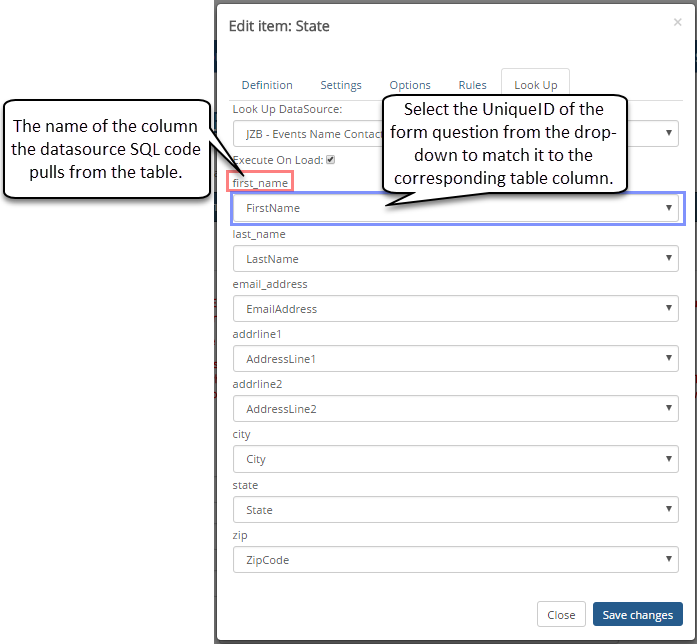
18. From the Look Up DataSource drop-down, select the datasource you want to use to look up information. The table columns associated with the data source appear with corresponding drop-downs.
19. From the drop-downs, select the Unique IDs of the form questions/fields you want to auto-populate with information from the matching table columns. Example
20. If you want your look up to execute immediately when the form is accessed, select the Execute on load checkbox. By default, the lookup will execute when the value of the question changes.
21. If the questions/fields being populated should trigger the question/field's events, select the Trigger After Set checkbox.
22. If you want to save the text a user manually inputs in a field that utilizes a lookup, select the Preserve user input checkbox. If there is a default value in the field, that would also be preserved. If you use the default value setting and pre-populate the field with @@LastName for example, it considers that user input and the value wouldn't be overwritten if this setting is checked. If this is not selected, the text pre-populated by the lookup will overwrite any text that the user inputs.
23. Click Save changes.
An access control list data source is used to restrict who can see a form based on data returned from a query. For example, in the sample SQL below, the user that is currently logged in has an ID number does not exist in the data source, the link in the main view to the form will not be visible. This data source requires only one column to be returned.
Sample SQL:
SELECT
STUDENT_TERM_SUM.ID_NUM
FROM STUDENT_MASTER
JOIN STUDENT_TERM_SUM
ON
STUDENT_TERM_SUM.ID_NUM=STUDENT_MASTER.ID_NUM
WHERE STUDENT_TERM_SUM.TRANSACTION_STS
=
'C'
AND
STUDENT_TERM_SUM.PT_FT_STS
=
'F'
|
Users without an ERP ID number will not be able to see the form. This includes JICS Administrator account, portal-only accounts, and external sign-up users. |
1. Log in to the campus portal as an administrator and access J1 FormFlow - Forms.
2. Click Manage Forms. The Manage Forms page appears.
3. To create a selection query:
a. Click Site Administrators.
b. From the toolbar, click Data Sources. The Data Source page appears.
c. Click
the Add
icon
to the right of the DataSource drop-down list. The previously inactive
fields become active.
d. In the Name field, enter a name for the filter you want to apply.
e. From the Use Database drop-down, select the database you want to pull the access list from. This could your J1 database or another external database you are using with J1 FormFlow - Forms.
f. Select the Is Access Control List check box.
g. If you do not want the data source to be executed unless a user is logged in, select the Require Authentication checkbox. This may be useful if the data source contains sensitive information. Jenzabar recommends using string replacers in your data source query to further tailor the results that will display to the user.
h. In the DataSource Query field, enter your SQL query that will select the users you want to access the form. This could be by student classification, employee status, relation to student, etc.
i. Click Save DataSource.
j. Click Manage Forms. The Manage Forms page appears.
4. Click on the form you are working with.
5. Click Form Settings. The Form Information window appears.
6. Click the Access/Security tab.
7. From the Limit Access to drop-down, select the appropriate data source.
8. Click Save changes.
A waiver code data source can be created that will allow the user filling out the form to bypass payment regardless of the payment profiles assigned to a form. A waiver code data source should return only one column with only valid waiver codes. Once assigned to a question, such as a textbox question for a user to enter in their waiver code, if a user enters a value that appears in the results returned from the query, they'll be able to submit without a payment.
Basic Example:
SELECT
WAIVER_CODE
FROM MY_WAIVER_CODE_TABLE
Single Use Codes Example:
SELECT WAIVER_CODE
FROM MY_WAIVER_CODE_TABLE
WHERE WAIVER_CODE NOT IN
(
SELECT WAIVER_CDE
FROM SUBMISSION_PAYMENT_INFO
)
Log in to the campus portal as an administrator and access J1 FormFlow - Forms.
Click Manage Forms. The Manage Forms page appears.
Click Site Administrators.
From the toolbar, click Data Sources. The Data Source page appears.
Click the Add icon to the right of the DataSource
drop-down list. The previously inactive fields become active.
In the Name field, enter a name for the datasource you want to create.
From the Use Database drop-down, select the database you want to pull the data from. This could your J1 database or another external database you are using with J1 FormFlow - Forms.
In the DataSource Query field, enter your SQL query that will select and/or filter the information in your database that you want to make available in your form.
Click Save DataSource.
Click Manage Forms. The Manage Forms page appears.
Click on the form you are working with.
Click on the tab you want to work with.
Right-click on the textbox question you are using for waiver codes and select Properties. The Edit Item window appears. TIP: You can name this textbox question "Waiver Code".
Click the Settings tab.
From the Waiver Code Datasource drop-down, select the waiver code data source you created.
Click Save changes.
Why won't my datasource populate my drop-down question?
Double check your datasource to ensure that any literal string replacers do not have any apostrophes around them. A correct literal string replacer should read @@Faculty.

