Follow the guidance in the Configuration Checklist and the Standard Setup topics.
Access the Supervisors window in J1 Desktop.
Right-click and select Add Row. A new row appears.
In the ID Number column, enter the ID number for the employee being added as a supervisor.
To search for an ID Number, right-click and select Advanced Search.
In the Number of Employees column, enter the number of employees they supervise.
Click the Save button.
Access the HR Positions via Payroll window in J1 Desktop.
In the ID Number column, enter the ID number for the employee being assigned to the supervisor.
To search for an ID Number, right-click and select Advanced Search.
From the Supervisor drop-down list option, select the employee's supervisor for the position.
If an employee has multiple positions within your organization, scroll down and select the supervisor for each active position to be available via CRM Staff.
Click the Save button.
Access the HR Employee Master via Payroll or HR Positions via Payroll window in J1 Desktop.
In the ID # column, enter the ID number for the user to be available via JICS. The employee's information on the Name tab appears.
Click the Positions tab. The position information for the selected employee appears. Example
If an employee has multiple positions within your organization, scroll down and select the Show On Web? checkbox for each position to be available via CRM Staff.
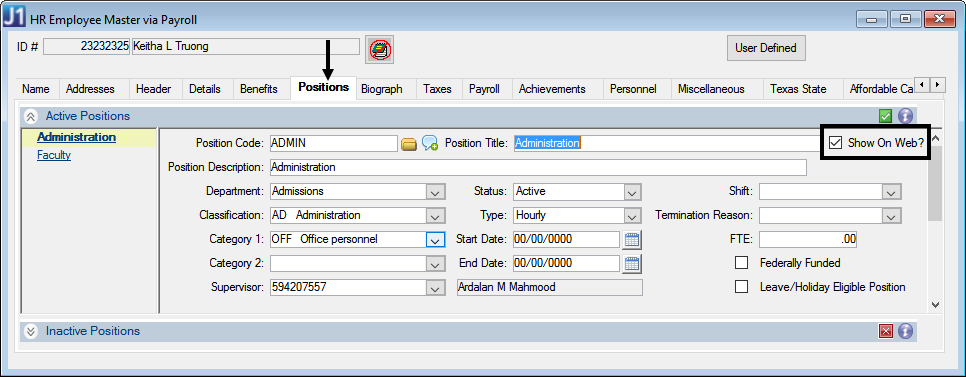
Select the Show On Web? checkbox.
Click the Save button.
Configuration settings in JICS can be done by roles with permission to access and administer global and portlet settings.
![]() |
If you are an administrator and need help setting up and configuring this feature, see the detailed setup sections below. |
1. Log into the campus portal as a Timecard Approval administrator.
2. Access the main screen of the Timecard Approval feature.
3. Click Admin Options. The Admin Options screen appears.
4. Click Timecard Submission Deadlines. The Set Up Deadlines screen appears.
5. In the Time Entry Cutoff Date column, enter the numbers of days after each pay period ends in which employees have to enter their worked hours.
After this number of days, the period appears closed to the employee and they are unable to make changes to the hours they have saved on their timecard for the period.
6. In the Time Entry Submission Deadline column, enter the number of days after the Time Entry Cutoff Date that a manager has to submit their employees' timecards to Payroll.
If a timecard has not been submitted after this number of days, it is considered overdue in any list of current pay periods.
7. Click the Save Deadlines button. The configurations are established and the Admin Options screen reappears.
1. Log into the campus portal as a Timecard Approval administrator.
2. Access the main screen of the Timecard Approval feature.
3. Click Admin Options. The Admin Options screen appears.
4. Click Timecard Entry Rules. The Define Timecard Entry Rules screen appears.
5. To allow employees to enter hours for future dates and times, select the If selected, employees may enter hours for dates and times later than the current time checkbox.
6. Click the Save Entry Rules button. The configurations are established, and the Admin Options screen reappears.
1. Log into the campus portal as a Timecard Approval administrator.
2. Access the main screen of the Timecard Approval feature.
3. Click Admin Options. The Admin Options screen appears.
4. Click Supervisor and Alternate Approver Assignments. The Supervisors and Alternate Approvers screen appears.
Assign a supervisor that can view, edit, and submit timecards for all pay groups:
From the Supervisor(s) section, click Edit Supervisors. The Edit Alternate Approvers screen appears.
Click Edit Approver(s). The Select Users window appears.
From the users panel, scroll down to find the users.
To quickly find a user, sort them by role or enter a specific name in the Last Name and First Name search options. If the user is not displayed, they may not be in the system. Contact your IT Department for more information.
Select the users and click the Add button.
Click the OK button. The Select Users window closes and the selected users can now view, edit, and submit timecards for all pay groups.
Click the Save Approvers button. The Edit Alternate Approvers screen closes and the Supervisors and Alternate Approvers screen reappears.
Assign alternate approvers to a new pay group:
Alternate approvers can edit or submit timecards for selected departments, pay groups, or pay groups within any departments.
Click Add Approvers for a new Group. The Add Alternate Approvers by Employee Group screen appears.
From the Pay Groups list, select the pay groups for which you are adding approvers. The Add Approvers link appears.
Click Add Approver(s). The Select Users window appears.
From the users panel, scroll down to find the users.
To quickly find a user, sort them by role or enter a specific name in the Last Name and First Name search options. If the user is not displayed, they may not be in the system. Contact your IT Department for more information.
Select the users, and click the Add button.
Click the OK button. The Select Users window closes, and the selected users can now edit or submit timecards for the selected pay groups.
Click the Save Approvers button. The Add Alternate Approvers by Employee Group screen closes, and the Supervisors and Alternate Approvers screen reappears.
Assign alternate approvers by an existing pay group:
Locate the pay group to which you want to add alternate approvers.
Click the Edit
icon. The Edit
Alternate Approvers screen appears.
Click Edit Approver(s). The Select Users window appears.
From the users panel, scroll down to find the users.
To quickly find a user, sort them by role or enter a specific name in the Last Name and First Name search options. If the user is not displayed, they may not be in the system. Contact your IT Department for more information.
Select the users, and click the Add button.
Click the OK button. The Select Users window closes and the selected users can now edit or submit timecards for the selected pay groups.
Click the Save Approvers button. The Edit Alternate Approvers screen closes, and the Supervisors and Alternate Approvers screen reappears.
Assign alternate approvers for a new manager:
Alternate approvers for managers can edit and submit timecards for any of the selected manager's employees.
Click Add Approvers for a new Manager. The Add Alternate Approvers for a Manager screen appears.
Select the manager for whom you want to add alternate approvers. The Add Approver(s) link appears.
Click Add Approver(s). The Select Users window appears.
From the users panel, scroll down to find the users.
To quickly find a user, sort them by role or enter a specific name in the Last Name and First Name search options. If the user is not displayed, they may not be in the system. Contact your IT Department for more information.
Select the users, and click the Add button.
Click the OK button. The Select Users window closes, and the selected users can now edit or submit timecards for the employees of the selected manager.
Click the Save Approvers button. The Add Alternate Approvers for a Manager screen closes, and the Supervisors and Alternate Approvers screen reappears.
Assign alternate approvers for an existing manager:
Locate the manager for whom you want to add alternate approvers.
Click the Edit
icon. The Edit
Alternate Approvers screen appears.
Click Edit Approver(s). The Select Users window appears.
From the users panel, scroll down to find the users.
To quickly find a user, sort them by role or enter a specific name in the Last Name and First Name search options. If the user is not displayed, they may not be in the system. Contact your IT Department for more information.
Select the users and click the Add button.
Click the OK button. The Select Users window closes, and the selected users can now edit or submit timecards for the employees of the selected manager.
Click the Save Approvers button. The Edit Alternate Approvers screen closes, and the Supervisors and Alternate Approvers screen reappears.
1. Log into the campus portal as a Timecard Approval administrator.
2. Access the main screen of the Timecard Approval feature.
3. Click Admin Options. The Admin Options screen appears.
4. Click Supervisor and Alternate Approver Assignments. The Supervisors and Alternate Approvers screen appears.
Remove a supervisor and/or supervisor alternate:
From the Supervisor(s) section, click Edit Supervisors. The Edit Alternate Approvers screen appears.
Click Edit Approver(s). The Select Users window appears.
From the Selected Users panel, select the supervisor to be removed.
Click the Remove button. The supervisor is removed.
Click the OK button. The Select Users window closes, and the selected users can no longer edit or submit timecards.
Click the Save Approvers button. The Edit Alternate Approvers screen closes, and the Supervisors and Alternate Approvers screen appears.
Remove alternate approvers from a pay group:
Locate the pay group from which you are removing an alternate approvers.
To delete all approvers,
click the Delete icon. All designated alternate approvers
are removed from the selected pay group.
OR
To delete select approvers,
click the Edit icon. The Edit
Alternate Approvers screen appears.
Click Edit Approver(s). The Select Users window appears.
From the Selected Users panel, select the alternate approvers to be removed from the pay group.
Click the Remove button. The alternate approvers are removed.
Click the OK button. The Select Users window closes, and the selected users can no longer edit or submit timecards.
Click the Save Approvers button. The Edit Alternate Approvers screen closes, and the Supervisors and Alternate Approvers screen appears.
Remove alternate approvers for a specific manager:
Locate the manager from which you are removing an alternate approvers.
To delete all approvers,
click the Delete icon. All designated alternate approvers
are removed from the selected manager.
OR
To delete select managers,
click the Edit icon. The Edit
Alternate Approvers screen appears.
Click Edit Approver(s). The Select Users window appears.
From the Selected Users panel, select the alternate approvers to be removed from the manager.
Click the Remove button. The alternate approvers are removed.
Click the OK button. The Select Users window closes, and the selected users can no longer edit or submit timecards.
Click the Save Approvers button. The Edit Alternate Approvers screen closes, and the Supervisors and Alternate Approvers screen appears.
1. Log into the campus portal as a Timecard Approval administrator.
2. Access the main screen of the Timecard Approval feature.
3. Click Admin Options. The Admin Options screen appears.
4. Click Rounding of Hours. The Rounding of Hours screen appears.
5. From the Rounding Increment options, select the time increment for rounding hours. For example, if you want hours rounded down to the nearest 15 minutes, then an employee who clocks in or out at 12:07 would be shown as clocked at 12:00.
6. From the Round Direction options, determine if you want to round hours up, down, or to the closest time.
7. Click the Save Rounding button. The hour rounding configurations are saved, and the Admin Options screen reappears.
You can choose the format employees in a selected pay group will use to enter their hours.
1. Log into JICS as a Timecard Approval administrator.
2. Access the Timecard Approval feature. The current year automatically appears.
3. From the Active Periods for Your Pay Groups drop-down options, you can select the period year for the pay group for which you want establish the timecard format. The pay groups are displayed.
4. The active periods for the current year automatically appear.
5. From the Pay Group column, click on the pay group for which you want to establish or update the timecard format. The Pay Group page appears with the current timecard card format displayed in the upper right-hand corner.
6. Click Change. The Primary Timecard Format Select page appears.
7. Select the timecard format for the pay group.
Hourly allows employees to enter start and end times to log the exact hours they worked for every shift.
Real Time allows employees to clock in and clock out using an online real time clock.
Daily Total allows employees to enter the number of hours they logged each day of the pay period.
Period Summary allows employees to enter their total hours worked for the entire pay period.
8. Click the Save Format button.